릴리즈 2.2.0 이상
Synap Editor 초기화
사이냅 에디터의 초기화는 아래와 같이 새 객체를 생성하는 구문으로 간단히 이루어집니다.
<!DOCTYPE html>
<html lang="ko">
    <script src='synapeditor.config.js'></script>
    <script>
        function initEditor() {
            new SynapEditor('synapEditor', synapEditorConfig);
        }
    </script>
    <body onload="initEditor();">
        <div id="synapEditor"></div>
    </body>
</html>
추가적인 환경설정은 SynapEditor 객체 생성시에 인자로 명시하거나, 별도의 설정 파일을 통해서도 가능합니다.
객체 생성을 통한 환경설정
window.editor = new SynapEditor('synapEditor', {
	'editor.license': '/resource/license.json',
	'editor.toolbar': ['new','open','|', 'paragraphStyleWithText', '|', 'fontFamilyWithText', '|','fontSizeWithText', '|','bold', 'italic', 'underline', 'strike', '|','fontColor', 'fontBackgroundColor'],
	'editor.size.width': '100%',
	'editor.size.height': '100%',
	'editor.lang.default': 'en',
	'editor.menu.show': false
});
독립적인 config file을 이용한 환경설정
window.editor = new SynapEditor('synapEditor', '/resource/config.json');
var synapEditorConfig = {
	'editor.license': '/resource/license.json',
	'editor.size.width': '100%',
	'editor.size.height': '100%',
	'editor.lang.default': 'en',
	'editor.menu.show': false,
	'editor.toolbar': ['new','open','|', 'paragraphStyleWithText', '|', 'fontFamilyWithText', '|','fontSizeWithText', '|','bold', 'italic', 'underline', 'strike', '|','fontColor', 'fontBackgroundColor']
}
라이센스 설정
라이센스 파일의 경로 또는 라이센스 객체를 설정합니다.
'editor.license' 설정은 필수 설정이며, 미 설정시 에디터가 동작하지 않습니다.
{
    'editor.license': '/resource/license.json'
}
{
    'editor.license': {
        'company': 'SynapSoft',
        'key': [
            'licenseKey'
        ]
    }
}
초기화 예시
위와 같은 파라메터들을 설정한 경우 사이냅에디터는 아래와 보입니다.

툴바 설정
'editor.toolbar'키를 이용해서 아래와 같이 설정합니다.
{
	'editor.toolbar': ['new','open','|', 'paragraphStyleWithText', '|', 'fontFamilyWithText', '|','fontSizeWithText', '|','bold', 'italic', 'underline', 'strike', '|','fontColor', 'fontBackgroundColor']
}
| TOOLBAR KEY | ICON | 설명 |
|---|---|---|
| new |
| 편집중인 내용을 모두 지우고 새문서를 만든다. |
| open |
| 문서를 임포트한다. |
| 인쇄를 한다 | |
| pageBreak |
| 인쇄시 사용되는 페이지 구분자를 추가한다 |
| template |
| 템플릿 다이얼로그를 연다 |
| autoSave |
| 자동저장된 문서목록을 불러온다 |
| undo |
| 실행취소 |
| redo |
| 재실행 |
paragraphStyle |
| 문단스타일을 지정한다 (P, H1 ~ H6) |
paragraphStyleWithText |
| 문단스타일 지정버튼을 드롭다운 형태로 보여준다 |
fontFamily |
| 글꼴을 설정한다 |
fontFamilyWithText |
| 글꼴설정 버튼을 드롭다운 형태로 보여준다 |
fontSize |
| 글자크기를 설정한다 |
fontSizeWithText |
| 글자크기 설정버튼을 드롭다운 형태로 보여준다 |
| customParagraphStyle |
| 사용자정의 문단스타일을 보여준다. 사용자정의 문단스타일은 config에 설정해야한다. |
| customRunStyle |
| 사용자정의 글자스타일을 보여준다. 사용자정의 글자스타일은 config에 설정해야한다. |
| growFont |
| 글자크기를 한단계 키운다. |
| shrinkFont |
| 글자크기를 한단계 줄인다. |
| bold |
| 굵게 |
| italic |
| 기울임 |
| underline |
| 밑줄 |
| strike |
| 취소선 |
| superScript |
| 위첨자 |
| subScript |
| 아래첨자 |
| fontColor |
| 글자색 |
| fontBackgroundColor |
| 글자배경색 |
| align |
| 문단정렬 (left, center, right, justify) |
| copy |
| 복사 |
| cut |
| 잘라내기 |
| paste |
| 붙여넣기 |
| copyRunStyle |
| 서식복사 |
| pasteRunStyle |
| 서식붙여넣기 |
| removeRunStyle |
| 서식지우기 |
| link |
| 링크 |
| unlink |
| 링크해제 |
| table |
| 표 삽입 |
| image |
| 이미지 삽입 |
| background |
| 문서 배경 이미지 및 색 지정 |
| video |
| 동영상 삽입 |
| file |
| 파일 삽입 |
| horizontalLine |
| 가로줄 삽입 |
| specialCharacter |
| 특수문자 삽입 |
| emoji |
| 이모지 삽입 |
| div |
| 레이어 삽입 |
| drawDiv |
| 레이어 그리기 |
| quote |
| 인용문구 삽입 |
| bulletList |
| 글머리 기호 |
| numberedList |
| 글머리 번호 |
| multiLevelList |
| 다단계 글머리 |
| increaseIndent |
| 들여쓰기 |
| decreaseIndent |
| 내어쓰기 |
| lineHeight |
| 줄간격 |
| lineHeightWithText |
| 줄간격 버튼을 드롭다운 형태로 보여준다. |
| paragraphProperties |
| 문단 상세속성 편집 |
| fullScreen |
| 전체화면 |
| source |
| 소스보기 |
| preview |
| 미리보기 |
| ruler |
| 줄자 |
| divOutline |
| 레이어 외각선 보이기/감추기 |
| accessibility |
| 웹접근성 검사 |
| personalDataProtection |
| 개인정보보호 (검출) |
| find |
| 찾기/바꾸기 |
| | | 가로 나눔선 | |
| - | 세로 나눔선 |
글꼴 목록
'editor.fontFamily'로 편집시 사용할 폰트 목록을 설정합니다.
{
	'editor.fontFamily': {
    	'ko': [
            '돋움', '굴림', '바탕', '궁서', '맑은고딕',
            'Arial', 'Comic Sans MS', 'Courier New', 'Georgia',
            'Lucida Sans Unicode', 'Tahoma', 'Times New Roman', 'Trebuchet MS', 'Verdana'
        ],
        'en': [
            'Arial', 'Comic Sans MS', 'Courier New', 'Georgia',
            'Lucida Sans Unicode', 'Tahoma', 'Times New Roman', 'Trebuchet MS', 'Verdana'
        ]
    }
}
| 한국어일 때 (ko) | 영어일 때 (en) |
|---|---|
|
|


메뉴 설정
'editor.menu.show'키로 메뉴 사용여부를 결정한다.
{
	'editor.menu.show': true
}
'editor.menu.list'를 이용해서 1 depth 메뉴를 구성한다.
{
	'editor.menu.list': [
    	'file',
	    'edit',
	    'view',
	    'insert',
	    'format',
	    'table',
	    'tools'
	  ]
}
'editor.menu.definition'를 이용해서 서브메뉴를 구성한다.
{
'editor.menu.definition': {
'file': [
'new',
'open',
'-',
'template',
'autoSave',
'print',
'pageBreak'
],
'edit': [
'undo',
'redo',
'-',
'copy',
'-',
'find'
],
'view': [
'fullScreen',
'-',
'source',
'preview'
],
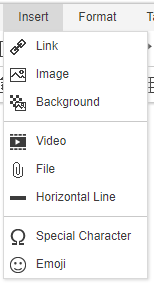
'insert': [
'link',
'image',
'background',
'-',
'video',
'file',
'horizontalLine',
'-',
'specialCharacter',
'emoji'
],
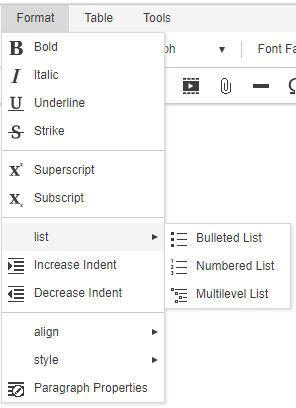
'format': [
'bold',
'italic',
'underline',
'strike',
'-',
'superScript',
'subScript',
'-',
{
'groupName': 'list',
'subMenuItems': [
'bulletList',
'numberedList',
'multiLevelList'
]
},
'increaseIndent',
'decreaseIndent',
'-',
{
'groupName': 'align',
'subMenuItems': [
'alignLeft',
'alignCenter',
'alignRight',
'alignJustify'
]
},
{
'groupName': 'format',
'subMenuItems': [
'copyRunStyle',
'pasteRunStyle',
'removeRunStyle'
]
},
'paragraphProperties'
],
'table': [
'table',
'deleteTable',
'tableProperties',
'-',
{
'groupName': 'row',
'subMenuItems': [
'insertRowBefore',
'insertRowAfter',
'deleteRow'
]
},
{
'groupName': 'column',
'subMenuItems': [
'insertColBefore',
'insertColAfter',
'deleteCol'
]
},
{
'groupName': 'cell',
'subMenuItems': [
'mergeCell',
'splitCell',
'cellProperties'
]
}
],
'tools': [
'accessibility',
'personalDataProtection'
]
}
}
| 메뉴 설정 | 결과 | 메뉴 설정 | 결과 |
|---|---|---|---|
'file': [
    'new',
    'open',
    '-',
    'template',
    'autoSave',
    'print',
    'pageBreak'
]
|
| 'edit': [
'undo',
'redo',
'-',
'copy',
'-',
'find'
]
|  |
'view': [
    'fullScreen',
    '-',
    'source',
    'preview'
]
|
| 'insert': [
'link',
'image',
'background',
'-',
'video',
'file',
'horizontalLine',
'-',
'specialCharacter',
'emoji'
] |
|
'format': [ 'bold',
'italic',
'underline',
'strike',
'-',
'superScript',
'subScript',
'-',
{
'groupName': 'list',
'subMenuItems': [
'bulletList',
'numberedList',
'multiLevelList'
]
},
'increaseIndent',
'decreaseIndent',
'-',
{
'groupName': 'align',
'subMenuItems': [
'alignLeft',
'alignCenter',
'alignRight',
'alignJustify'
]
},
{
'groupName': 'style',
'subMenuItems': [
'copyRunStyle',
'pasteRunStyle',
'removeRunStyle'
]
},
'paragraphProperties'
] |
| 'table': [
'table',
'deleteTable',
'tableProperties',
'-',
{
'groupName': 'row',
'subMenuItems': [
'insertRowBefore',
'insertRowAfter',
'deleteRow'
]
},
{
'groupName': 'column',
'subMenuItems': [
'insertColBefore',
'insertColAfter',
'deleteCol'
]
},
{
'groupName': 'cell',
'subMenuItems': [
'mergeCell',
'splitCell',
'cellProperties'
]
}
]
|
|
'tools': [
    'accessibility',
    'personalDataProtection'
] |
|


Import API 및 Upload API 설정
'editor.import.api', 'editor.upload.image.api', 'editor.upload.video.api', 'editor.upload.file.api' 키를 사용하여 업로드 및 임포트 API를 설정한다.
이 때 서버쪽 API (URL)는 Back-end 구현에 따라 변경해야 한다. 자세한 사항은 서버연동 매뉴얼을 참고한다.
{
	'editor.import.maxSize': 10485760,
	'editor.import.api': '/importDoc',
	'editor.import.param': {},
	'editor.upload.maxSize': 3145728,
	'editor.upload.image.api': '/uploadImage',
	'editor.upload.image.param': {},
	'editor.upload.video.api': '/uploadVideo',
	'editor.upload.video.param': {},
	'editor.upload.file.api': '/uploadFile',
	'editor.upload.file.param': {},
}
업로드 가능 확장자 설정
'editor.upload.image.extensions', 'editor.upload.video.extensions', 'editor.upload.file.extensions' 키를 사용해 업로드 가능 확장자를 설정할 수 있다.
{
	'editor.upload.image.extensions': ['jpg', 'gif', 'png', 'jpeg'],
	'editor.upload.video.extensions': ['mp4', 'ogg', 'webm'],
	'editor.upload.file.extensions': ['bmp', 'css', 'csv', 'diff', 'doc',
									'docx', 'eof', 'gif', 'jpeg', 'jpg',
									'json', 'mp3', 'mp4', 'm4a', 'odp',
									'ods', 'odt', 'ogg', 'otf', 'patch',
									'pdf', 'png', 'ppt', 'pptx', 'rtf',
									'svg', 'swf', 'textile', 'tif', 'tiff',
									'ttf', 'txt', 'wav', 'webm', 'woff',
									'xls', 'xlsx', 'xml', 'md', 'vtt',
									'hwp', 'hml', 'html']
}
언어 설정
'editor.lang.default' 키를 이용해서 기본언어를 설정한다. 기본언어는 사용자환경에 맞는 언어가 없을 경우 표시되는 언어를 말한다.
{
	'editor.lang.default': 'en'
}
사용자 환경에 관계없이 특정 언어를 서비스를 하려면 'editor.lang' 키를 이용한다.
{
	'editor.lang' : 'en'
}
고급 설정
템플릿
브라우저에서 접근가능한 특정 위치에 template 파일을 등록하고 아래와 같이 설정하면 template기능을 사용 할 수 있다.
{
	'editor.template': [
	{
		'category': 'template_category1',
		'label': 'Report',
		'items': [
		{
			'name': 'Research Report',
			'path': '/resource/template/template1.html'
		},
		{
			'name': 'Sales Report',
			'path': '/resource/template/template2.html'
		}]
	}]

}
사용자 정의 스타일 (Custom style)
사용자정의 문단스타일을 사용하려면 아래와 같이 환경설정을 해야 한다.
{
	'editor.customStyle.paragraph': [
    {
      'name': 'Gray',
      'style': {
        'color': {
          'r': 170,
          'g': 170,
          'b': 170
        }
      }
    }
  ],
}
사용자정의 문단스타일 적용결과

사용자 정의 런스타일은 아래와 같이 설정합니다.
{
	'editor.customStyle.textRun': [
    {
      'name': 'BigRed',
      'style': {
        'fontSize': 32,
        'color': {
          'r': 255,
          'g': 0,
          'b': 0
        }
      }
    },
    {
      'name': 'SmallBlue',
      'style': {
        'fontSize': 16,
        'color': {
          'r': 0,
          'g': 0,
          'b': 255
        }
      }
    }
  ]
}
사용자 정의 런스타일 설정 결과

기본 스타일 지정 (Default Style)
- 기본 스타일을 지정하여 inline-style로 랜더링 됩니다.
'editor.defaultStyle': 지정하고싶은 모델 Element Type에 기본 속성을 지정할 수 있습니다.
- cssText String 형태로 지정하고싶은 Style을 설정
- 현재 나열된 Element들의 속성만 지정 가능
'editor.defaultStyle': {
    'Body': 'font-family: Arial, Helvetica, sans-serif; font-size: 11pt; line-height: 1.2;',
    'Paragraph': '',
    'TextRun': '',
    'Div': '',
    'Image': '',
    'Video': '',
    'List': '',
    'ListItem': '',
    'Quote': '',
    'Table': '',
    'TableRow': '',
    'TableCell': '',
    'HorizontalLine': '',
    'Iframe': ''
},
자동 저장
자동저장 사용여부 및 저장주기는 아래와 같이 설정가능하다.
{
	'editor.autoSave': true,
	'editor.autoSave.period': 60000,
}
ContentFilter
'editor.contentFilter.allowIFrame' 값을 false로 설정하면 사용자 iframe tag 삽입을 제한하여 자동 태그 제거.
'editor.contentFilter.allowIScript' 값을 false로 설정하면 사용자 script tag 삽입을 제한하여 자동 태그 제거.
 {
	'editor.contentFilter.allowIFrame': false,
	'editor.contentFilter.allowScript': false
}
Unload 메세지
'editor.unloadMessage' 값을 true로 설정하면 웹페이지가 unload 되었을 때 '페이지를 나가시겠습니까' 확인메세지가 보여집니다. (기본값 = false)
{
	'editor.unloadMessage': false
}
가로 스크롤
'editor.horizontalScroll' 값을 true로 설정하면 에디터에서 가로스크롤을 사용합니다. (기본값 = true)
{
	'editor.horizontalScroll': true
}
레이어 가이드
'editor.guide.div' 값을 true로 설정하면 에디터에서 레이어 가이드를 표시합니다. (기본값 = false)
{
	'editor.guide.div': false
}
툴바영역 고정
'editor.mode.sticky' 값으로 에디터에서 헤더 영역을 외부 스크롤에 고정할지 여부를 설정 합니다. (기본값 = false)
{
	'editor.mode.sticky': false
}
높이 조절
'editor.resizable' 값으로 에디터의 높이 조절가능 여부를 설정합니다. (기본값 = false)
{
	'editor.resizable': false
}