[AIWriteSupporter] Release 2.18.0, 3.0.0 and above Configuration Method
Release 2.18.0 and above, Release 3.0.0 and above.
An AI write supporter plugin that supports automatic content generation by integrating with generative AI.
It can automatically generate work content drafts or perform various edits, enabling efficient content creation.
Table of Contents
- Supported Browsers
- How to Use
- Loading Plugin Files
- Adding Buttons to the Toolbar
- Add to Toolbar
- Add to Quick Insert
- Configure the Plugin
- Available Keys (set in the text object)
- URL, API Key Settings
- Headers Settings
- Request Body Settings
- OCR URL Settings: Using the 'Image Attachment' Feature
- OCR Promotion Settings
- OCR Pro Settings
- User-Defined Prompt Settings
- Setting Prompt Menus to Show per Category
- Redefining the Draft Category Menu
- Hiding Edit and Create-By-Reference Categories
- Adding Custom Menus to the Favorites Category
- Prompt and Preview Window Default Size Settings
Supported Browsers
| Chrome | Edge | Safari | IE |
|---|---|---|---|
| ✓ | ✓ | ✓ | ✗ |
The officially supported web browsers are as follows:
- Latest version of Microsoft Edge
- Latest version of Google Chrome
- Latest version of Apple Safari
It may work in other browsers, but not all features may work correctly.
Internet Explorer browser is not supported.
How to Use
Loading Plugin Files
<!-- The SynapEditor object must exist for this to take effect,
     so include after the editor script files. -->
<script src="url of aiWriteSupporter.min.js"></script>
<link rel="stylesheet" href="url of aiWriteSupporter.min.css">
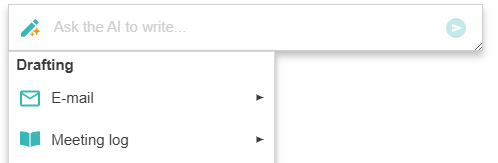
Adding Buttons to the Toolbar
You can add the button that requests AI to write to the toolbar area, balloon, quick insert, or menu area.
Add to Toolbar

// synapeditor.config.js
//...
'editor.toolbar': [
    // AI request button
    'openTextAI',
    //...
],
// ...
Add to Quick Insert

// synapeditor.config.js
//...
'editor.quickInsert': [
    // AI request button
    'openTextAI',
    //...
],
// ...
Configure the Plugin
Settings related to the text generation AI are defined under the text key, and settings related to the image generation AI are defined under the image key as an object.
For details on image generation AI, see the related link: [AIWriteSupporter] Image Generation AI
'aiWriteSupporter.config': {
    text: { // Text writing AI settings
        url: '/request',
        //...
    },
    image: { // Image generation AI settings
        url: '/request',
        //...
    }
}
Available Keys (set in the text object)
<table> <thead> <tr><th>Key</th><th>Type</th><th>Required</th><th>Default</th><th>Description</th></tr> </thead> <tbody> <tr> <td><code>url</code></td> <td>string</td> <td>O</td> <td><code>''</code></td> <td>Sets the URL to send the request to.
- OpenAI API address
- URL implemented to make requests through the OpenAI API
- URL implemented to make requests through HyperCLOVA X
If not set, the plugin button is not displayed on the toolbar.
</td> </tr> <tr> <td><code>apiKey</code></td> <td>string</td> <td></td> <td><code>''</code></td> <td>Sets the API Key issued by OpenAI.
https://platform.openai.com/account/api-keys
Using this setting exposes the Key value in the browser, so for safety it is recommended to not set the Key value and make requests through the server.
</td> </tr> <tr> <td><code>ai</code></td> <td>string</td> <td></td> <td><code>'gpt'</code></td> <td>Sets the AI to use. Default value is 'gpt'.
- OpenAI GPT:
'gpt' - NAVER HyperCLOVA X:
'hcx'
Sets custom HTTP headers to send with AI requests.
Used for call source identification, per-service usage tracking, internal logging, etc.
</td> </tr> <tr> <td><code>requestBody</code></td> <td>Object</td> <td></td> <td><code>{}</code></td> <td>Sets additional content to send to the API.
max_tokenstemperaturen- ....
For more details, refer to the link below.
https://platform.openai.com/docs/api-reference/completions/create
</td> </tr> <tr> <td><code>ocrUrl</code></td> <td>string</td> <td></td> <td><code>''</code></td> <td>Setting the OCR URL enables the 'Image Attachment' menu in the draft creation menu.
When an image is attached, the text in the image is extracted and sent to the AI together with the prompt.
</td> </tr> <tr> <td><code>ocrApiKey</code></td> <td>string</td> <td></td> <td></td> <td>Sets the API Key to be used for OCR API calls.
</td> </tr> <tr> <td><code>ocrDirectApiKey</code></td> <td>boolean</td> <td></td> <td><code>false</code></td> <td>Option that sets whether to pass apiKey as-is (without encryption) when making OCR API requests.
Set to true when using OCR Pro.
Adds user-defined prompt menus.
Set an array of objects that have key, type, label, prompt keys.
Sets the prompt menus to show per category.
Categories are as follows:
favorite: Favoritesdraft: Draftedit: Edit or ReviewcreateByReference: Create by Referencewrite: Writing
Sets the default size of the prompt and preview window. (unit: px)
If set below the minimum size, the minimum size is applied.
</td> </tr> </tbody> </table>URL, API Key Settings
Sets the URL and API Key of the API to send requests to.
// synapeditor.config.js
// When setting URL and API Key
'aiWriteSupporter.config': {
    text: {
        url: 'request URL',
        apiKey: 'API key issued from OpenAI'
    }
}
Naver HyperCLOVA X Settings
// synapeditor.config.js
// url: URL implemented to make requests through HyperCLOVA X
'aiWriteSupporter.config': {
    text: {
        url: '/request',
        ai: 'hcx'
    }
}
Headers Settings
You can set custom HTTP headers to send with AI requests.
When multiple services use the same AI API in common, setting service-specific label values in the header can be used.
For example, by extracting the AI-Label value on the server, it can be used for per-service usage aggregation, cost monitoring, log analysis, etc.
// synapeditor.config.js
// Headers settings
'aiWriteSupporter.config': {
    text: {
        url: 'url',
        apiKey: 'apiKey',
        headers: {
            'AI-Label': 'synapeditor'
        }
    }
}
Request Body Settings
Sets additional values needed for API requests.
The values that can be set for GPT can be found at the link below.
https://platform.openai.com/docs/api-reference/completions/create
// synapeditor.config.js
// Request body settings
'aiWriteSupporter.config': {
    text: {
        url: 'url',
        apiKey: 'apiKey',
        requestBody: {
            temperature: 2,
            presence_penalty: 2,
            ...
        }
    }
}
The values that can be set for HyperCLOVA X are as follows:
| Field | Type | Description |
|---|---|---|
temperature | double | Diversity of generated tokens (higher value allows more diverse sentence generation) — 0~1 (default: 0.5) |
topK | int | Samples the top k tokens by probability from the candidates — 0~128 (default: 0) |
topP | double | Samples token candidates based on cumulative probability — 0~1 (default: 0.8) |
repeatPenalty | double | Penalty for generating the same token (higher value reduces the probability of repeating the same result) — 0~10 (default: 5) |
stopBefore | string | Token generation stop character — [] (default) |
maxTokens | int | Maximum number of tokens to generate — 0~2048 (default: 2048) |
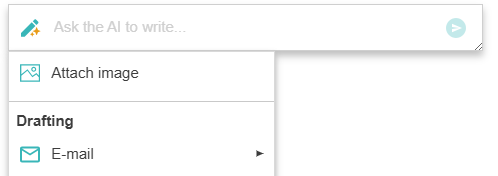
OCR URL Settings: Using the 'Image Attachment' Feature
When you set ocrUrl, the 'Image Attachment' menu is enabled in the draft creation menu.
The 'Image Attachment' feature extracts text from the image and sends it to the AI together with the entered prompt.
Usage example) Attach a press release image → Enter 'Summarize' prompt → Send
OCR Promotion Settings
// synapeditor.config.js
'aiWriteSupporter.config': {
    text: {
        ocrUrl: 'https://ailab.synap.co.kr/sdk', // Available during the promotion period.
        ocrApiKey: 'issued API key'
    }
}
OCR Pro Settings
// synapeditor.config.js
'aiWriteSupporter.config': {
    text: {
        ocrUrl: 'OCR pro url',
        ocrApiKey: 'issued API key',
        ocrDirectApiKey: true // default: false
    }
}
User-Defined Prompt Settings
Adds user-defined prompts.
// synapeditor.config.js
'aiWriteSupporter.config': {
    text: {
        customPrompts: [
            {
                key: 'my-custom-menu1',
                type: 'prompt',
                label: {
                    ko: '나의 커스텀 메뉴 1',
                    en: 'My custom menu'
                },
                prompt: {
                    ko: '바나나를 영어로',
                    en: 'banana in english',
                }
            },
            {
                key: 'my-custom-menu2',
                type: 'immediately',
                label: {
                    ko: '나의 커스텀 메뉴 2',
                    en: 'My custom menu'
                },
                prompt: {
                    ko: '포도를 영어로',
                    en: 'grape in english',
                }
            },
            {
                key: 'my-custom-menu3',
                type: 'group',
                label: {
                    ko: '내가 제일 자주쓰는 메뉴 모음',
                    en: 'My most used menu'
                },
                items: ['englishTranslation', 'tabularFormat']
            }
        ]
    }
}
Setting Prompt Menus to Show per Category
Sets the prompt menus to show per category.
Categories are 'favorites', 'draft', 'edit', 'createByReference', 'write', and you can check the menus included in each category in the predefined prompt menu.
| Key | Category | When the category is displayed | Default value |
|---|---|---|---|
favorites | Favorites | Always | [] |
draft | Draft | When 'Request AI' is executed while editor content is not selected (caret state) | ['emailGroup', 'meetingLogGroup', 'proposalGroup', ...] |
edit | Edit or Review | When 'Request AI' is executed while editor content is selected; when an answer to an AI request is received | ['polishing', 'correctSpelling', 'writeShort', 'writeLong', ...] |
createByReference | Create by Reference | When 'Request AI' is executed while editor content is selected; when an answer to an AI request is received | ['summarize', 'translationGroup', 'explanation', 'findA...', ...] |
write | Writing | When 'Request AI' is executed while editor content is selected; when an answer to an AI request is received | ['continueWriting'] |
Redefining the Draft Category Menu
You can redefine the menu shown in the category.
The predefined prompt menu keys in the plugin can be checked in [AIWriteSupporter] Predefined Prompt Menu.
<table> <thead> <tr><th>Applied appearance</th><th>Settings</th></tr> </thead> <tbody> <tr> <td>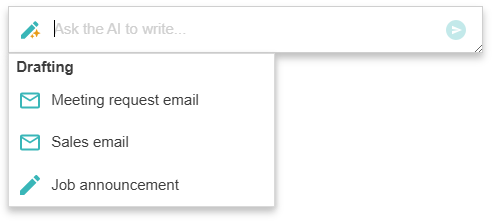
// synapeditor.config.js
'aiWriteSupporter.config': {
    text: {
        categoryConfig: {
            draft: [
                'meetingRequestEmail', 'salesEmail', 'jobAnnouncement'
            ]
        }
    }
}
Hiding Edit or Review (edit), Create by Reference (createByReference) Categories
Setting an empty array on a category hides the category.
<table> <thead> <tr><th>Applied appearance</th><th>Settings</th></tr> </thead> <tbody> <tr> <td>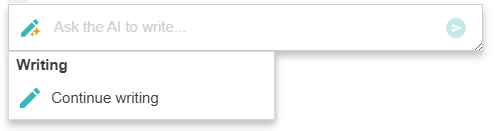
// synapeditor.config.js
'aiWriteSupporter.config': {
    text: {
        categoryConfig: {
            edit: [],
            createByReference: []
        }
    }
}
Adding Custom Menus to the Favorites Category
The Favorites category is always displayed in all situations.
You can add frequently used prompt menus.
<table> <thead> <tr><th>Applied appearance</th><th>Settings</th></tr> </thead> <tbody> <tr> <td>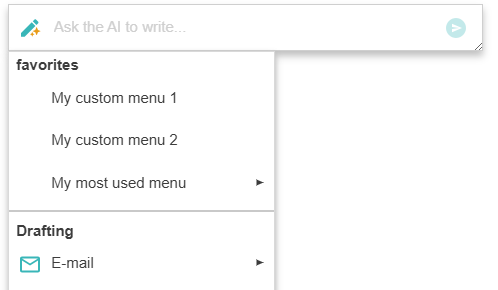
// synapeditor.config.js
// Adding custom menus to the Favorites category
'aiWriteSupporter.config': {
    text: {
        categoryConfig: {
            favorites: ['my-custom-menu1', 'my-custom-menu2', 'my-custom-menu3']
        },
        customPrompts: [
            {
                key: 'my-custom-menu1',
                type: 'prompt',
                label: {
                    ko: '나의 커스텀 메뉴 1',
                    en: 'My most used menu'
                },
                prompt: {
                    ko: '바나나를 영어로',
                    en: 'banana in english',
                }
            },
            {
                key: 'my-custom-menu2',
                type: 'immediately',
                label: {
                    ko: '나의 커스텀 메뉴 2',
                    en: 'My most used menu'
                },
                prompt: {
                    ko: '포도를 영어로',
                    en: 'grape in english',
                }
            },
            {
                key: 'my-custom-menu3',
                type: 'group',
                label: {
                    ko: '내가 제일 자주쓰는 메뉴 모음',
                    en: 'My most used menu'
                },
                items: ['englishTranslation', 'tabularFormat']
            }
        ]
    }
}
Prompt and Preview Window Default Size Settings
You can set the size at which the prompt and preview screens will appear. If not set, the default value ({ width: '380px', height: '260px' }) is applied.
// synapeditor.config.js
'aiWriteSupporter.config': {
    text: {
        url: '/request',
        areaSize: { width: '500px', height: '350px' }
        //...
    }
}
The prompt and preview screen appear with the default size ({ width: '380px', height: '260px' }).
The prompt and preview screen appear with the configured size ({ width: '500px', height: '350px' }).